Installing Aluminium Coping
Building construction requires installing aluminium coping to protect the top edges of walls, especially roof parapets. Its major goal is to prevent water from entering the building structure and causing costly repairs. Due to its resilience, lightweight, and corrosion resistance, aluminium is a great coping material for long-term environmental protection.
Aluminium coping must be properly installed for building lifespan and aesthetics. Poor installation can cause water leaks, structural damage, and increased maintenance expenses. This article will walk you through installing aluminium coping, from gathering equipment and materials to finishing with a professional and secure fit. These procedures will enable DIYers and contractors to install with precision and confidence.
Tools and Supplies
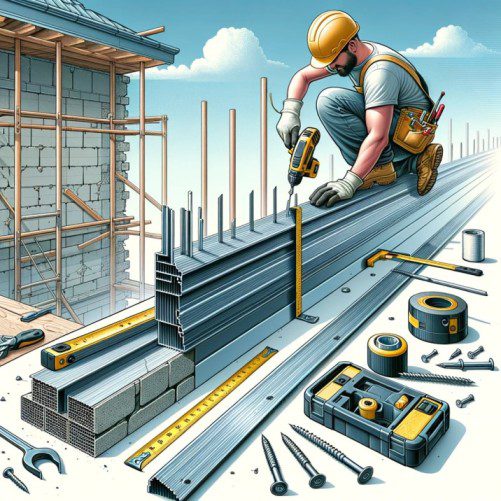
Gather all the equipment and supplies before installing aluminium coping to guarantee a seamless job. A complete list to help you:
Tools:
- Tape Measure for accurate wall and aluminium coping measurements.
- Cut aluminium coping to length with metal snips.
- Use metal drill bits to drill bracket holes.
- Rivet guns or screws secure the coping, depending on your attachment option.
- Water-proofing caulking gun.
Chalk Line: For level installation, mark long, straight lines.
Level: To ensure all installed pieces are horizontal.
The workplace may need safety glasses, gloves, and a hard helmet.
Materials:
Aluminium Coping: Available in numerous sizes and designs to suit your building’s aesthetic and practical needs.
Brackets: These hold the coping to the wall.
sealer: A high-quality, weatherproof sealer to waterproof the coping.
Rivets versus screws: Installation choice and structural criteria.
Butyl Tape or Foam Backer Rod: Seals coping joints.
A good installation requires preparation, which you can do with the correct equipment and supplies.

Installing Aluminium Coping Prepare Steps
Proper preparation is essential for a smooth and robust aluminium coping installation. Follow these preparatory steps carefully:
Measure and Plan:
Wall Assessment: Check the wall for coping installation. Check for damage and structural integrity.
Take Measurements: Measure the wall length to estimate coping and bracket quantities.
Consider adding 10% additional material for waste and cutting mistakes.
Plan Layout: Arrange brackets equally for best support. Brackets are usually 24–36 inches apart.
Safety Advice:
Check Weather: Wind and rain may make aluminium coping installation risky and difficult.
Wear safety gear: Protect yourself from aluminium coping edges and falls by using safety gear.
Scaffolding and ladders should be safe and steady when operating at height.
Instructions for Installation
Following these comprehensive procedures, installation can begin:
Prior to installation, clean the top of the wall to eliminate any debris, dust, or loose material that might hinder the process. Use primer or waterproofing membrane as needed.
To measure and cut aluminium coping, use the previously measured measures to draw the coping with a chalk line for straight cuts.
Cutting the coping with metal snips should be clean and straight. Make sure it fits before fastening.
Bracket Installation:
Place brackets according to your scheme. Make level, aligned bracket holes in the wall with the drill.
Check that the brackets are securely attached to the wall using screws or rivets.
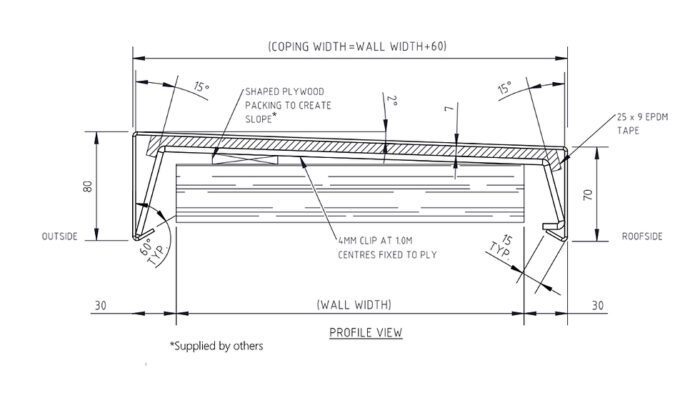
Fitting the Coping: Place aluminium coping over brackets. Each piece should overlap by 2 inches to prevent water from leaking through joints.
Attach coping to brackets. If your coping has a snap-on mechanism, click each piece in place; otherwise, rivet or screw.
Use a caulking gun to apply sealant around the edges of the coping where it meets the wall and at any connections between sections.
Seal all seams and joints to prevent water entry.
Final adjustments and checks:
Make sure the coping is firmly fixed and sealed along its length.
Adjust brackets and sealant for a tidy finish.
Maintenance and Care
Regular maintenance is necessary to keep your freshly placed aluminium coping in good shape and protecting your structure.
Important maintenance tips:
The frequency of regular inspections is: Check for wear and damage at least twice a year, usually in spring and autumn.
Look for: Check for loose parts, corrosion, and sealant failures. Make sure the coping is aligned and secure.
Procedure for cleaning: Remove leaves and dirt from the coping. Clean the surface with a gentle cloth or brush and mild detergent and water.
Stay away from harsh chemicals: Do not use harsh cleaners or chemicals that might harm the aluminium coping’s polish.
Aluminium Coping Immediate Repairs
Quickly Address Issues: Inspect for damage and fix it promptly to prevent future deterioration. Tighten screws, replace damaged components, or reapply sealant.
Professional Checks:
Talk to Experts: Consult a aluminium coping specialist if you see serious damage or are unsure how to proceed. They offer professional guidance and services to preserve coping integrity and functionality.
These maintenance and care methods may greatly extend the life of your aluminium coping and keep it protected.
Conclusion
Installing aluminium coping improves a building’s look and utility. You can install aluminium coping accurately and effectively by following this guide’s precise stages, from obtaining the right equipment and supplies to installing it carefully. Remember that appropriate installation reduces water penetration and improves your building’s structural integrity and aesthetics.
This article covers everything you need to install aluminium coping. Best outcomes require following safety and installation requirements throughout the procedure. Maintenance and upkeep are essential to extend the life of your coping and keep it safeguarding your structure.
The correct equipment, materials, and strategy may make installing aluminium coping easy and enjoyable. A job properly done, knowing you’ve protected a structure from the weather, is unmatched for DIYers and contractors.
Thank you for following our aluminium coping installation instructions. We hope it gives you the confidence and accuracy to complete your assignments. Follow our blog for building maintenance and improvement tips.
